Windows Orchestrator Integration Quickstart
Note: This guide is for the Windows Orchestrator included with Keyfactor prior to version 9. A similar guide for the Universal Orchestrator, included with Keyfactor version 9 and above, can be found here
In this quickstart guide, we will walk through the creation of an integration for the Windows Orchestrator that will manage keys in the Windows User store on the host computer running Microsoft Windows version 10+. Source code for the completed example can be found here.
Minimum system requirements:
- Visual Studio 2015 or Later
- .NET Framework 4.62
- Windows 10 or Windows Server 2012 or Later
Environment Setup
In order to begin developing an orchestrator integration, you will need the following:
- A test/sandbox/virtual instance of the Keyfactor Command Platform (the portal) running.
- A seperate host machine that the Orchestrator will run on, with the ability to communicate with the instance of Command.
Create Certificate Store Type
A Cert Store Type is needed so you can Create a Cert Store within Keyfactor to house all the Certificates that will be inventoried by the Orchestrator. Below we will go through the process of setting up a Cert Store Type.
-
Login to your instance of Keyfactor Portal. This will likely be either a test instance in the cloud or a virtual machine image running on your development machine. If necessary, contact your Keyfactor Account Manager for details on how to get a test instance of Keyfactor.
-
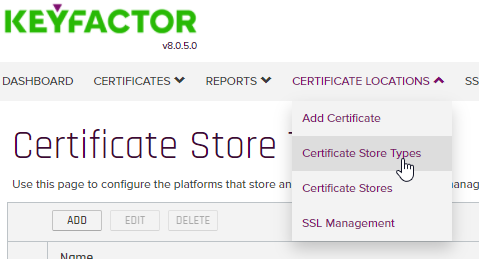
You will need to setup a Cert Store Type before installing and configuring the Keyfactor Orchestrator so navigate to Cert Store Types as shown below:
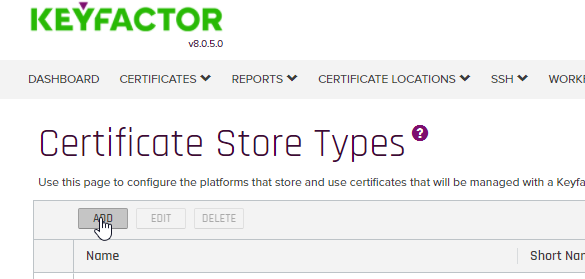
- Click the “Add” Button to add a new Cert Store Type:
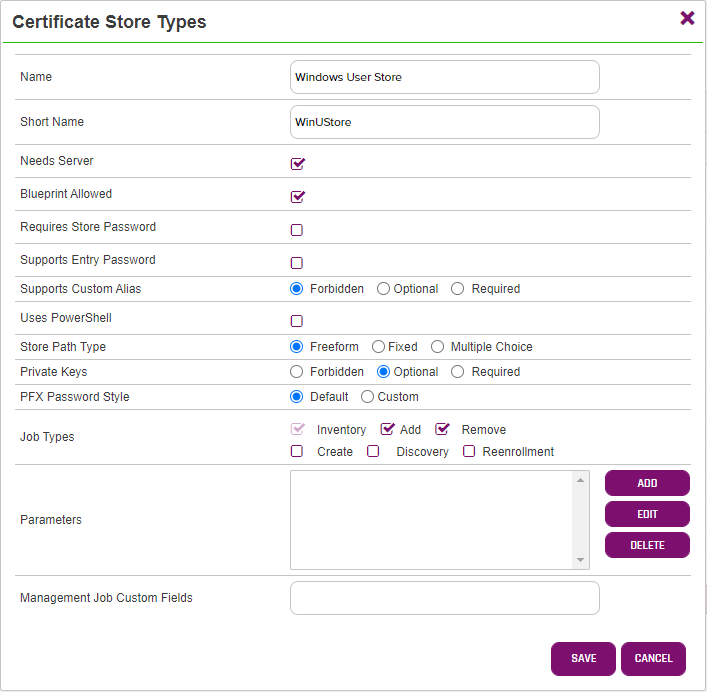
- Enter the following information and click “Save”. For purposes of simplifying this SDK these are all preset. If you would like to know what all these fields do in more detail, see the Keyfactor documentation.
Install the Orchestrator
Installing the Orchestrator will create a folder structure for the binary files and setup the Keyfactor Windows Service on the Host machine. This will enable the ability to later put custom plugins into this Keyfactor Windows Service Framework. When this document refers to Host it means the instance of Windows that the Orchestrator service is running on.
-
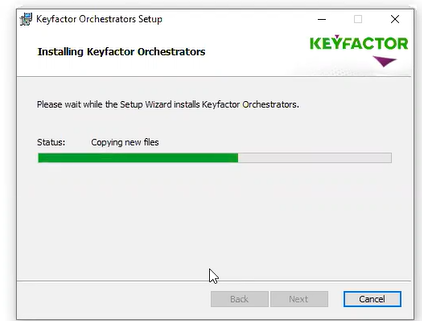
Installing The Orchestrator - Run the KeyfactorOrchestrator.msi installer on the host.
The install step unpacks and copies the binaries to the appropriate location on the operating system.
Example Installation progress:
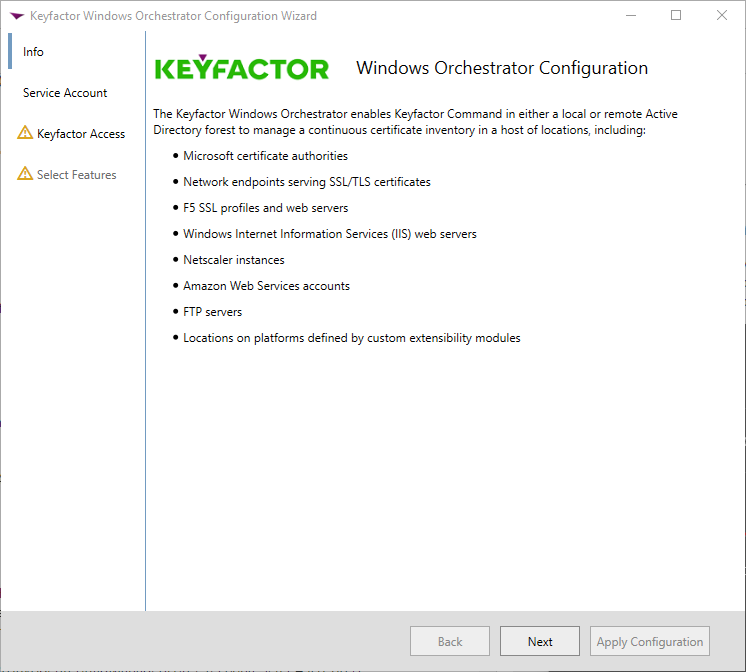
Once you launch the Configuration Wizard you should see a screen like the screen below:
After with Wizard launches Click Next for the Service Account step:
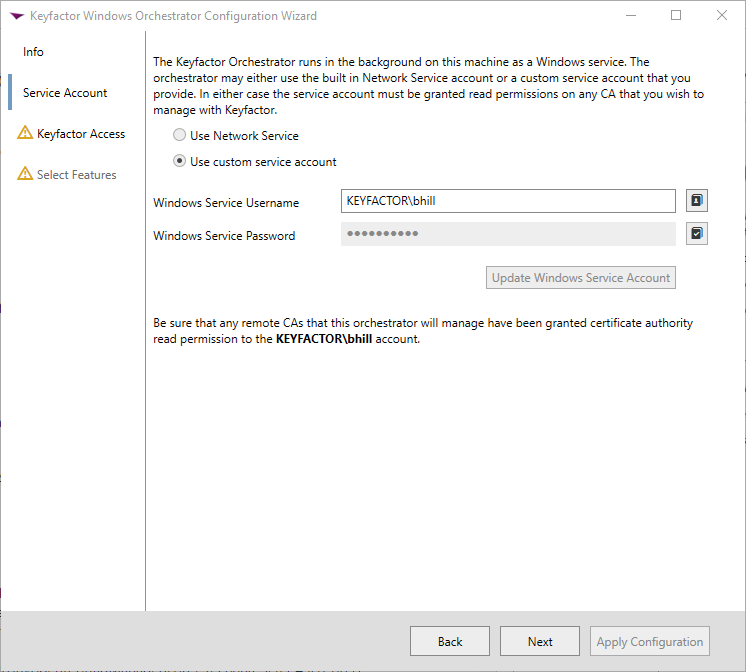
This account selected needs Read permissions on any CA that you wish to manage with Keyfactor. For this example, choose an account with read access to the TrustedPublishers certificate store on LocalMachine and click the “Update Windows Service Account” button then click Next and you will proceed to step 3 in the Wizard, shown Below:
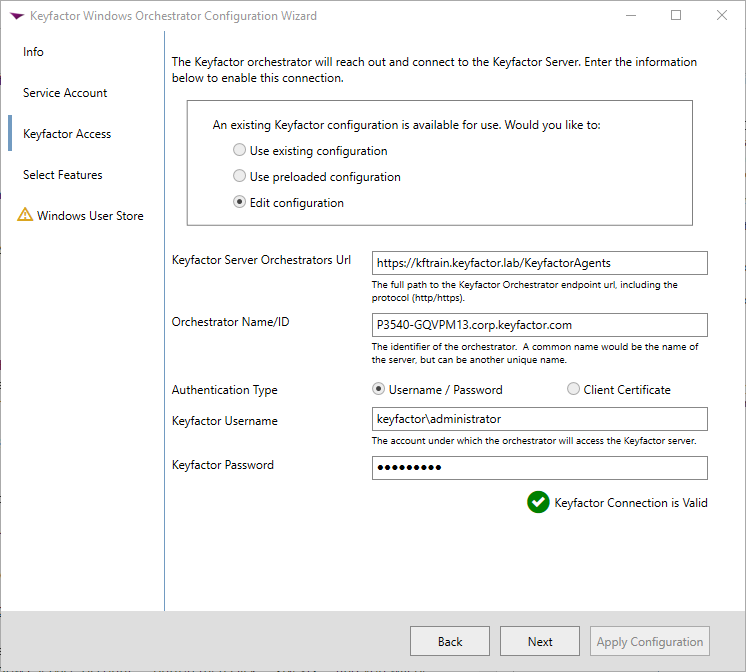
Enter the following information:
-
Keyfactor Server Orchestrators Url - This will be a URL of your Keyfactor Sandbox Instances plus “/KeyfactorAgents” at the end of the URL
-
Orchestrator Name/ID - This is a unique name that identififies the Orchestrator. A good name to use is the Host machine name of the Orchestrator.
-
Authentication Type - This will most likely be a Username and Password given to you by Keyfactor to use in the Sandbox Environment.
-
Click the “Validate Keyfactor Connection” button to verify the connection and you should get a green checkbox that indicates the Keyfactor connection is valid as shown above.
Create a Visual Studio Solution from the Template
We’ve provided the basic scaffolding of an integration solution to help you get started more quickly. It has the structure of a typical integration solution without any functionality. Starting with the template is not necessary, but recommended, since it includes Job classes defined to support the appropriate interfaces (which are necessary). For this walkthrough, we will start with the orchestrator template.
- Download the file “OrchestratorTemplate.zip” from here. This contains the parameterized Visual Studio project templates.
- Copy the zip file to the Visual Studio Templates location (no need to extract). The default location is:
%USERPROFILE%\Documents\Visual Studio 2019\Templates\ProjectTemplates. For help locating the template folder, refer to this article. - Close any open instances of Visual Studio and start it again.
- On the welcome screen, select “Create a new project”.
- On the next screen, you should now see “KeyfactorOrchestratorIntegration” in the list of project templates.
- Select it, and name the project “WindowsUserStore”.
Solution Setup
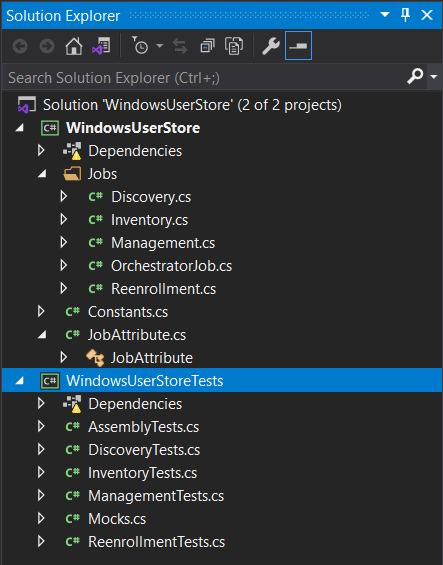
Once you created a new solution from the template, the solution explorer view should look like the following:
Create Reference Values
- Open the file
Constants.cs. - Set the value for
STORE_TYPE_NAMEto “WinUStore”. This needs to match the “Short Name” field created in the Cert Store Setup. - Add the following values that will identify the local certificate store:
STORE_NAME = "TrustedPublisher"STORE_LOCATION = "LocalMachine"
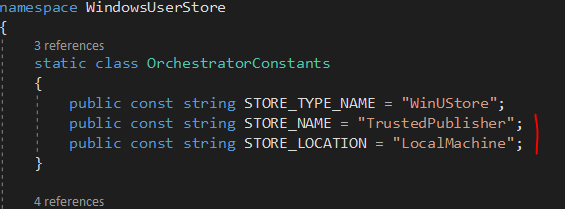
It would also be possible to make the store location a configurable property that is read from app.config as opposed to hard-coded values.
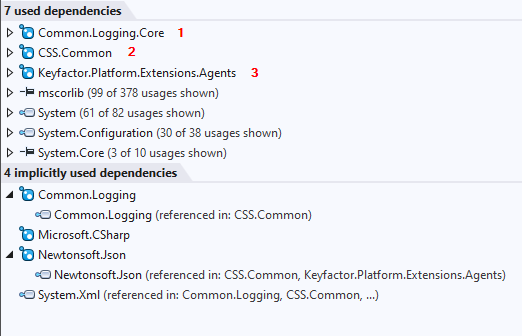
Nuget Packages
The following Keyfactor Nuget Packages required to build the Orchestrator are on the Keyfactor NuGet repository (https://nuget.pkg.github.com/Keyfactor/index.json).
Code Overview
Jobs
-
The job classes are defined in the
Jobsfolder. The template provides classes for Discovery, Inventory, Management and Reenrollment. The only jobs that need to be defined are those for which the orchestrator will be configured to support. When writing your own Orchestrator Integration, it is ok to remove the unnecessary classes. -
Jobs are derived from the
OrchestratorJobbase class, which returns the correct store type. -
Job Types are defined by the
JobAttribute(Example:[Job(JobTypes.INVENTORY)]). Which conveniently provides the values forGetJobClass()that each job is required to provide. -
Store Type + Job Type should uniquely identify the job in order for the Orchestrator to correctly call the job in the extension DLL.
-
The primary entry point of each job is the
processJobmethod. This will need to be implemented with the job handling logic for each job the extension will support.
Unit Tests
- The WindowsUserStoreTests project contains unit tests for the WindowsUserStore project.
- We’ve provided a collection of basic unit tests and mocking patterns to help get you started
- We highly recommend extending them for testing the specific functionality of your custom integrations.
Implementing the jobs
Now that we have our empty solution, let’s begin filling in the logic for the jobs.
The Inventory Job
Open Jobs/Inventory.cs and replace the contents with the following:
using System;
using System.Collections.Generic;
using System.Linq;
using System.Security.Cryptography.X509Certificates;
using Keyfactor.Platform.Extensions.Agents;
using Keyfactor.Platform.Extensions.Agents.Delegates;
using Keyfactor.Platform.Extensions.Agents.Enums;
using Keyfactor.Platform.Extensions.Agents.Interfaces;

namespace WindowsUserStore.Jobs
{
    [Job(JobTypes.INVENTORY)]
    public class Inventory : OrchestratorJob, IAgentJobExtension
    {
      public override AnyJobCompleteInfo processJob(AnyJobConfigInfo config, SubmitInventoryUpdate submitInventory, SubmitEnrollmentRequest submitEnrollmentRequest, SubmitDiscoveryResults sdr)
      {
        return PerformInventory(submitInventory);
      }

      private AnyJobCompleteInfo PerformInventory(SubmitInventoryUpdate inventoryCallback)
      {
        try
        {
          using (X509Store store = new X509Store(StoreName.My, StoreLocation.CurrentUser))
          {
            store.Open(OpenFlags.ReadOnly | OpenFlags.OpenExistingOnly);

            List<AgentCertStoreInventoryItem> inventory = store.Certificates.OfType<X509Certificate2>().Select(c => new AgentCertStoreInventoryItem()
            {
              Alias = c.Thumbprint.Replace(" ", ""),
              Certificates = new string[] { Convert.ToBase64String(c.RawData) },
              ItemStatus = Platform.Extensions.Agents.Enums.AgentInventoryItemStatus.Unknown,
              PrivateKeyEntry = c.HasPrivateKey,
              UseChainLevel = false
            })
            .ToList();

            if (!inventoryCallback.Invoke(inventory))
            {
              throw new Exception("Error submitting updated inventory");
            }
          }
        }
        catch (Exception)
        {
          Logger.Error("Error collecting new inventory");
          throw;
        }

        return new AnyJobCompleteInfo()
        {
          Status = 2, // Success
          Message = "Inventory completed successfully"
      };
    }
  }
}
Code Overview
If the Inventory by Keyfactor was successful the inventoryCallback.Invoke will return true meaning the job was successful. If it returns false or any other errors occurred then we should return an error status code back to Keyfactor. In some cases you might want to send a Warning back if some of the Inventory was successful and some was not. All possible status codes are listed below:
2 = Success
3 = Warning
4 = Failure
You will see the status codes in the Keyfactor Portal so you know if the job is successful or not. This will be shown later in this document.
The Management Job
- Open the file
Jobs/Management.cs. - The Management job differs from the other jobs because it handles a number of sub-jobs (Create Vault, Add Certificate, Remove Certificate).
- When a call to the Management job is made, the value passed for the
Job.OperationTypewill determine the action to take.
Management - Add
Now let’s add the logic for the PerformAdd method of the Management class. This will be called when Keyfactor sends a request to the orchestrator to add a new certificate via JobClass == "Management", Job.OperationType == 4.
The code below performs an Add operation to the store and returns a job status to the platform. Once in the store, the Inventory Job will pick it up and add it to your Keyfactor inventory.
protected Virtual AnyJobCompleteInfo PerformAddition(AnyJobConfigInfo config)
{
    try
    {
        using (var store = new X509Store((StoreName) _storeName, (StoreLocation) _storeLocation))
        {
            store.Open(OpenFlags.ReadWrite | OpenFlags.OpenExistingOnly);

            var certToAdd = GetCertFromBase64String(config.Job.EntryContents, config.Job.PfxPassword);
            if (certToAdd.Thumbprint != null)
            {
                var thumb = certToAdd.Thumbprint
                    .Replace(" ", "")
                    .Replace("\u200e", "");

                Logger.Trace($"Searching for certificate with thumbprint {thumb}");
                var searchResults = store.Certificates.Find(X509FindType.FindByThumbprint, thumb, false);

                if (searchResults.Count == 0)
                {
                    Logger.Trace("Adding certificate");
                    store.Add(certToAdd);
                }
                else
                {
                    Logger.Warn(
                        $"Certificate with thumbprint {thumb} already exists in store. No action will be taken");
                    return new AnyJobCompleteInfo
                    {
                        Status = 3, // Warning
                        Message =
                            $"Certificate with thumbprint {thumb} already exists in store. No action will be taken"
                    };
                }
            }
        }
    }
    catch (Exception)
    {
        Logger.Error("Error adding new certificate");
        return new AnyJobCompleteInfo
        {
            Status = 4, // Error
            Message = "Error adding new certificate"
        };
        throw;
    }

    return new AnyJobCompleteInfo
    {
        Status = 2, // Success
        Message = "Certificate added successfully"
    };
}
Add the helper method for converting a base64 encoded string to a new X509Certificate2 object at the bottom of the class.
  private X509Certificate2 GetCertFromBase64String(string entryContents, string password)
  {
      return new X509Certificate2(Convert.FromBase64String(entryContents),
          password,
          X509KeyStorageFlags.UserKeySet
              | X509KeyStorageFlags.PersistKeySet);
  }
Management - Remove
Next we will implement the code for removing a certificate from the store. The implementation of PerformRemove below removes the certificate from the store with the name and location we defined in Constants.
Once removed, we return the success status code (2) to Keyfactor. The certificate will be removed from the Keyfactor inventory store on the next Inventory job run.
private AnyJobCompleteInfo PerformRemove(AnyJobConfigInfo config)
{
    try
    {
        using (var store = new X509Store((StoreName) _storeName, (StoreLocation) _storeLocation))
        {
            store.Open(OpenFlags.ReadWrite | OpenFlags.OpenExistingOnly);

            var thumb = config.Job.Alias
                .Replace(" ", "")
                .Replace("\u200e", "");

            Logger.Trace($"Searching for certificate with thumbprint {thumb}");
            var searchResults = store.Certificates.Find(X509FindType.FindByThumbprint, thumb, false);

            if (searchResults.Count == 0)
            {
                Logger.Warn(
                    $"Certificate with thumbprint {thumb} does not exist in store. No action will be taken");
                return new AnyJobCompleteInfo
                {
                    Status = 3, // Warning
                    Message =
                        $"Certificate with thumbprint {thumb} does not exist in store. No action will be taken"
                };
            }

            Logger.Trace($"Removing certificate {thumb}");
            store.Remove(searchResults[0]);
        }
    }
    catch (Exception)
    {
        Logger.Error("Error removing certificate");
        return new AnyJobCompleteInfo
        {
            Status = 4, // Error
            Message = "Error removing certificate"
        };
        throw;
    }

    return new AnyJobCompleteInfo
    {
        Status = 2, // Success
        Message = "Certificate removed successfully"
    };
}
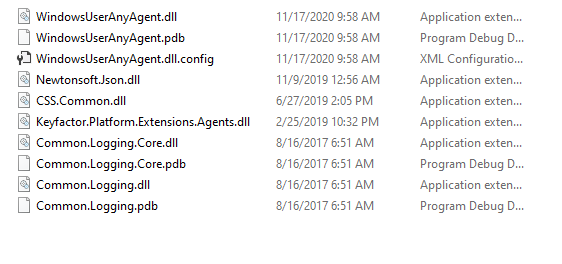
Build The Solution
After the solution is built you will have the following binaries that we will register with the Orchestrator in the configuration manager in the next section.
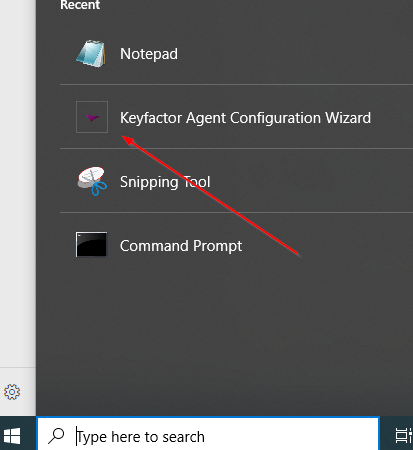
Register The Integration
Now that that we have a store type available and the code has been built, we can go through the process of registering the AnyAgent that was built with Keyfactor so it can be used. For this we will need to run the AnyAgent Configuration Wizard shown below. This should be there from the Agent Install that was performed earlier in the document.:
Once you launch the Configuration Wizard you should see a screen like the screen below:
After with Wizard launches Click Next and you will see the next step in the Wizard shown Below:
This account selected needs Read permissions on any CA that you wish to manage with Keyfactor. Choose an account you know has read access and click the “Update Windows Service Account” button then click Next and you will be presented with the 3rd step in the Wizard shown Below:
Here you will enter the following information:
-
Keyfactor Server Orchestrators Url - This will be a URL of your Keyfactor Sandbox or Cloud Test Instance plus “/KeyfactorAgents” at the end of the URL
-
Orchestrator Name/ID - This is a unique name that identififies the Orchestrator. A good name to use is the Host machine name of the Orchestrator.
-
Authentication Type - This will depend on the sandbox setup but will most likely be a Username and Password given to you by Keyfactor to use in the Sandbox Environment.
-
Click the “Validate Keyfactor Connection” button to verify the connection and you should get a green checkbox that indicates the Keyfactor connection is valid as shown above.
-
Click the Next button and you will be presented with Step 4 in the Wizard as shown below.
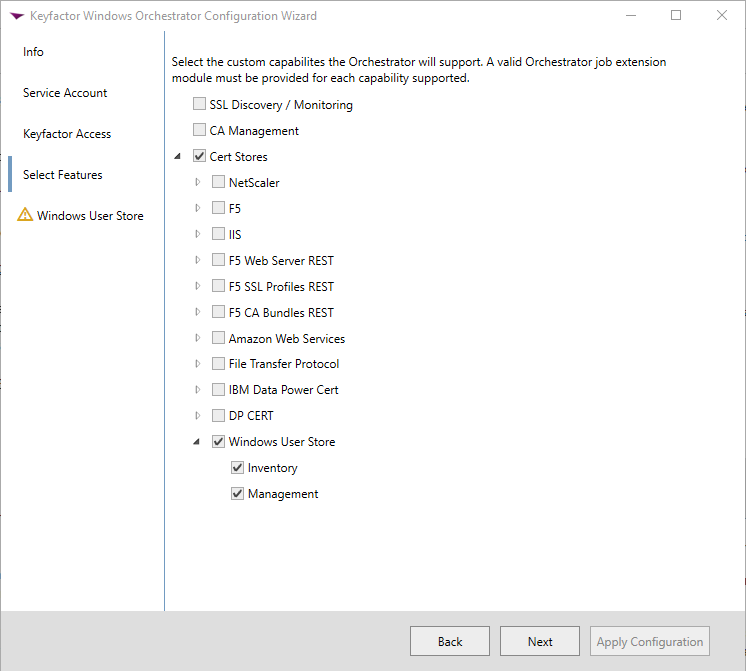
Select the “Windows User Store” Cert Store Type that was setup earlier in the process and select Inventory and Management so we can do both Inventory and CRUD jobs on the Cert store. Then click the Next button to reach Step 5 of the Configuration Wizard as shown below:
-
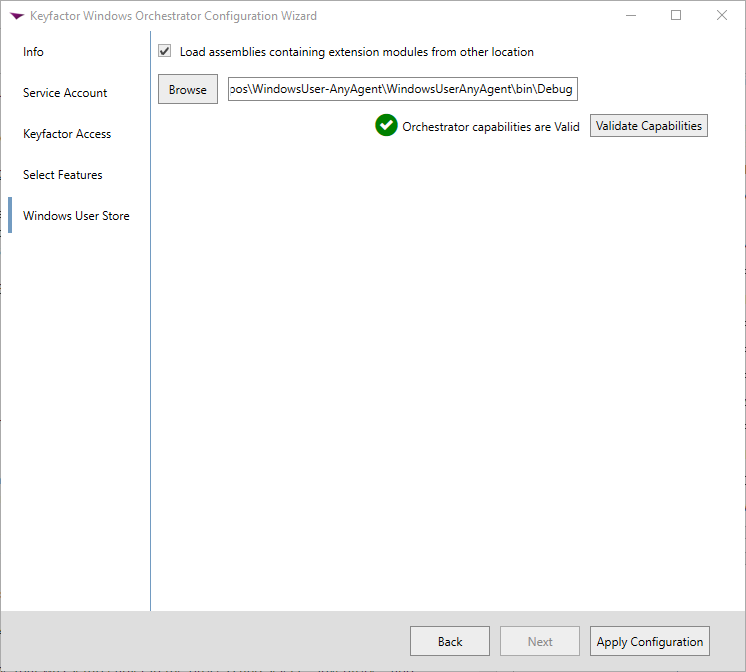
Select the “Load assemblies containing extension modules from other location” and select the folder contained the compiled binary files. (example:
%USERPROFILE%\source\repos\WindowsUserStore\WindowsUserStore\bin\Debug\netcoreapp3.1\) -
Click the “Validate Capabilities” button to ensure you get the green checkbox shown above.
-
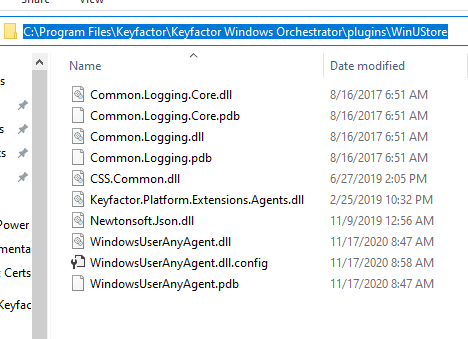
Click the “Apply Configuration” button. This begins the process of copying the binaries you complied to a location similar to the one below where the Keyfactor Windows Service Framework is running. It should also restart the Keyfactor Windows Service after the copy is complete.
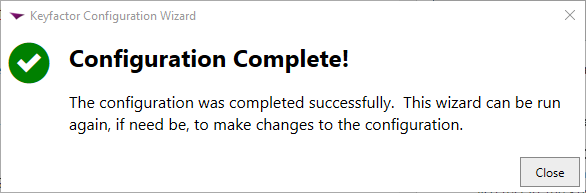
- If everything was successful you should be presented with the screen below:
Keyfactor Store Setup
Now that the AnyAgent is registered with Keyfactor and can communicate from the host machine to Keyfactor, we need to go through some steps inside of the Keyfactor to setup the Store and Scheduled Jobs.
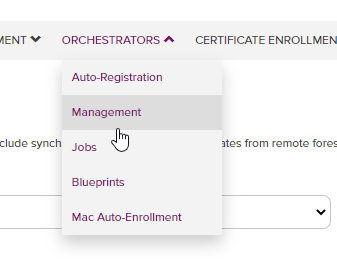
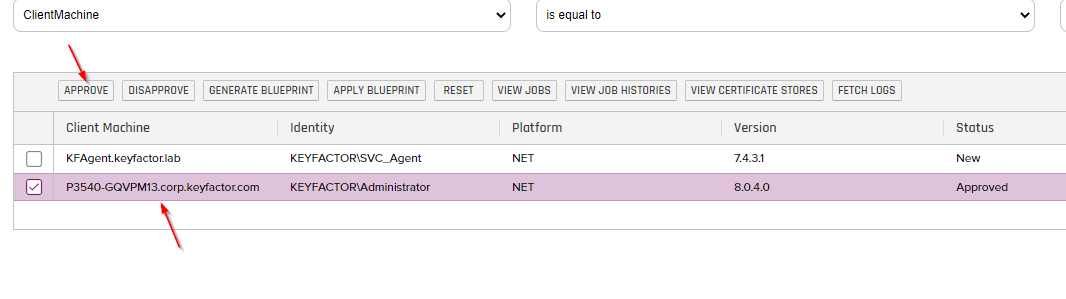
Orchestrator Approval
-
Log into the Keyfactor portal and Navigate to Orchestrators/Management as shown below.
-
You should see the Orchestrator we setup in the previous section as shown below. We need to Approve this Orchestrator before anything can work so click on the Orchestrator and click the “Approve” button as shown below:
Cert Store Setup
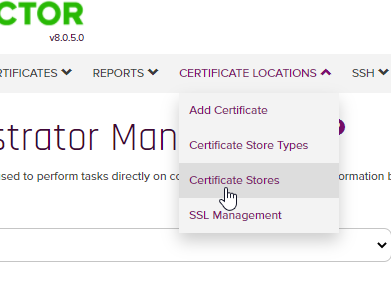
Once approved we can go through the process of adding a new cert store to start the inventory process.
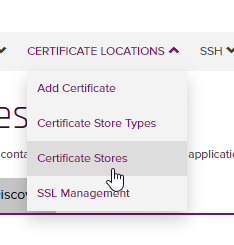
- To do this, navigate to the following location Certificate Locations/Certificate Stores:
- Click the “Add” button to add a new Cert Store as shown below and you will be presented with the dialog displayed in Step 5.
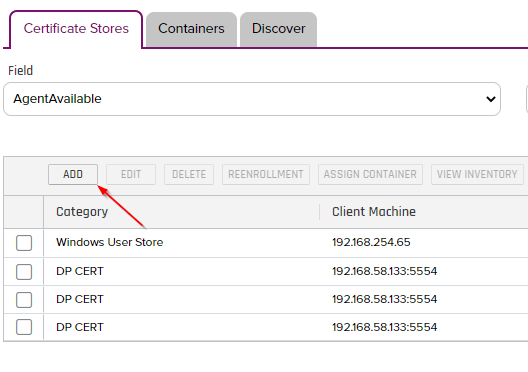
- The screenshot below illustrates all the fields that are required for a Cert Store.
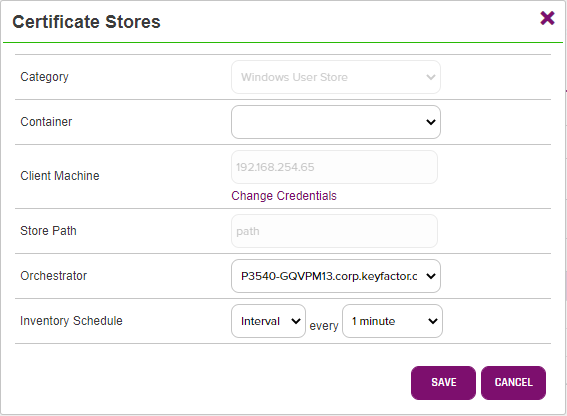
-
Category - This should be the Cert Store Type that was setup earlier in the document. In this case it was the “Windows User Store”.
-
Container - In this case, we are not using containers but this is a way to categorize the Cert Stores and gives some ability to perform operations on the Container.
-
Client Machine - This will be the Host machine where the Agent/Orchestrator was installed.
-
Change Credentials - Check “Use SSL” and enter the credentials to access the Host Machine
-
Orchestrator - Select the Orchestrator that was setup earlier in the document from this drop down.
-
Inventory Schedule - This will control how often the jobs will be run or checked in on such as the Inventory and CRUD jobs. In this case there will be an Inventory every 1 minute to see if there are new Certificates to be loaded into this Certificate store.
- After all the fields are filled out click the “Save” button.
Running the Jobs
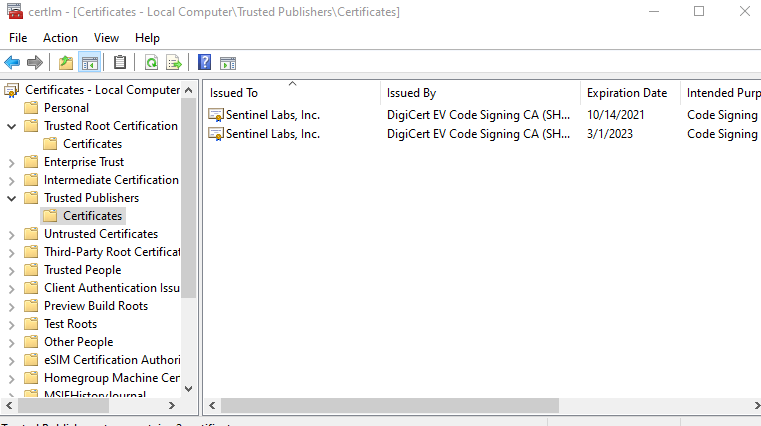
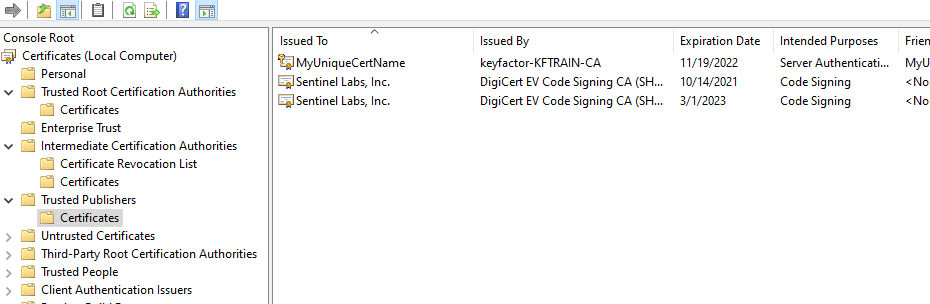
Now that the Orchestrator and Cert Stores are setup, Keyfactor should be ready to run jobs for Inventory, Add and Removal of certificates. Looking at the Certificates in that location on the Host machine, we see two Certificates in the TrustedPublishers LocalMachine store as shown below. Keyfactor should Inventory both of those Certificates into the Cert Store we set up eariler in the document.
Inventory Job
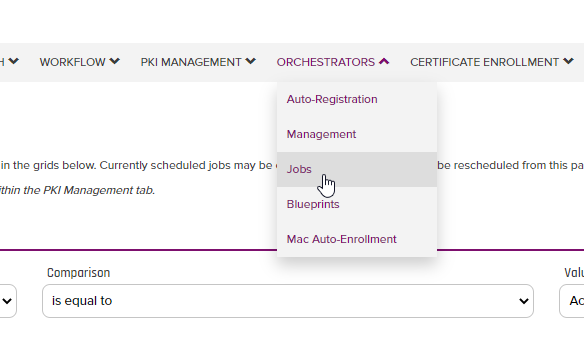
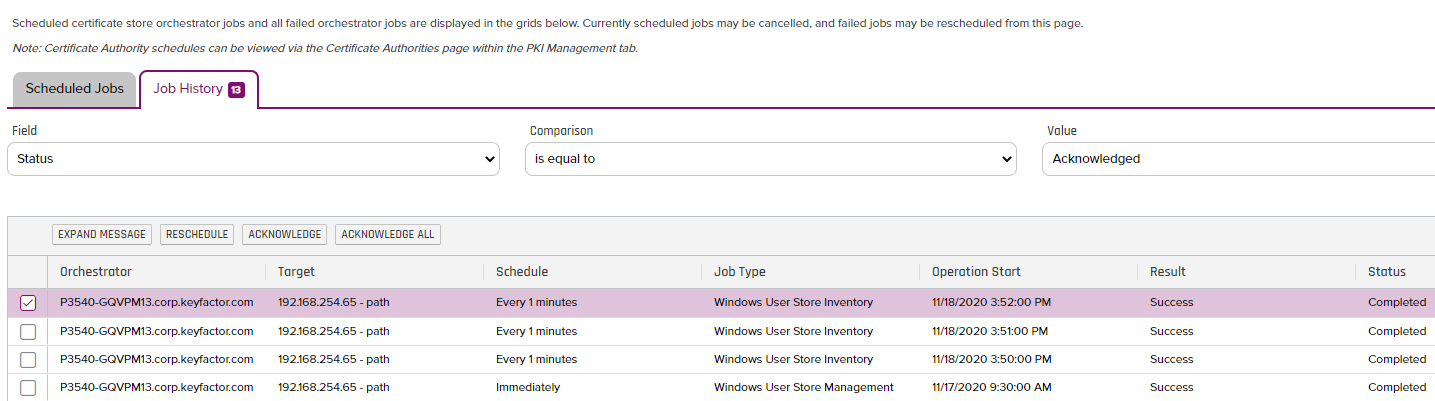
- First if we navigate to the Job History by Clicking “Orchestrators/Jobs” and click on the “Job History” tab, you should see a history run of the Inventory Job since it runs every 1 minute.
- As you can see, there have already been some successful runs of this Job as shown below. If you notice the Result and Status of the job, it was a success. If there were Errors or Warnings that the code ran into, those will be reflected in the “Status” column.
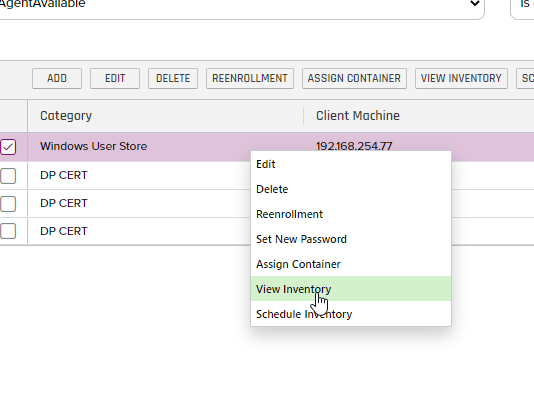
- Now if we navigate to the Certificate Locations/Certificate Stores menu item we can right click on the Cert Store we setup and View the Inventory for that Store as shown below:
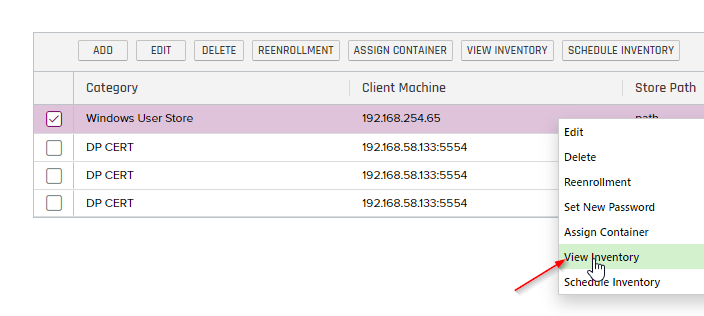
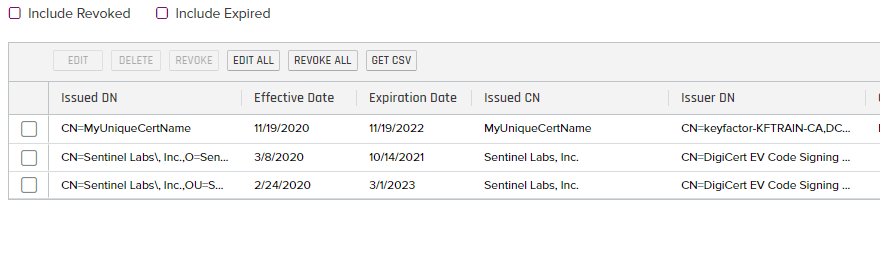
- Looking at the Inventory, it seems to have successfully inventoried the two Certificates that were in the store as shown below:

Add Job
We will now perform and Add/PFX Enrollment job which should add an additional Certificate into the Cert Store we created earlier in the document. This will in turn be Inventoried back into the Keyfactor Database which will show 3 Certificates after this is finished.
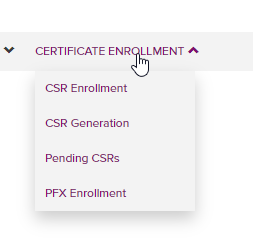
- Navigate to “Certificate Enrollment/PFX Enrollment” as shown below:
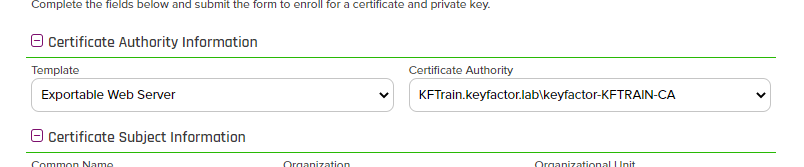
- Select a template from the Template Dropdown and a Certificate Authority. In this case, we will use the “Exportable Web Server” Template and “KFTrain” Certificate.
//TODO describe how to get templates in this dropdown
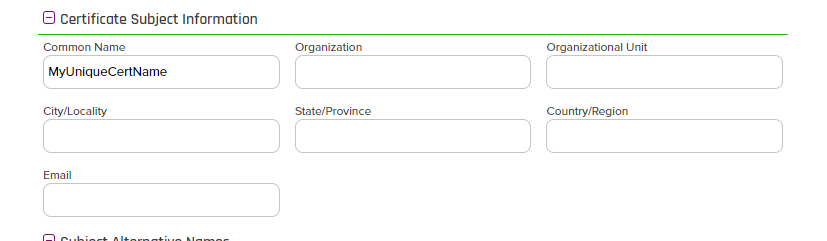
- Give the Certificate a unique common name as shown below:
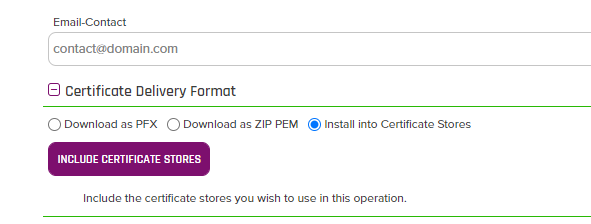
- Check the “Install into Certificate Stores” radio button and click the “Include Certificate Stores” button as shown below:
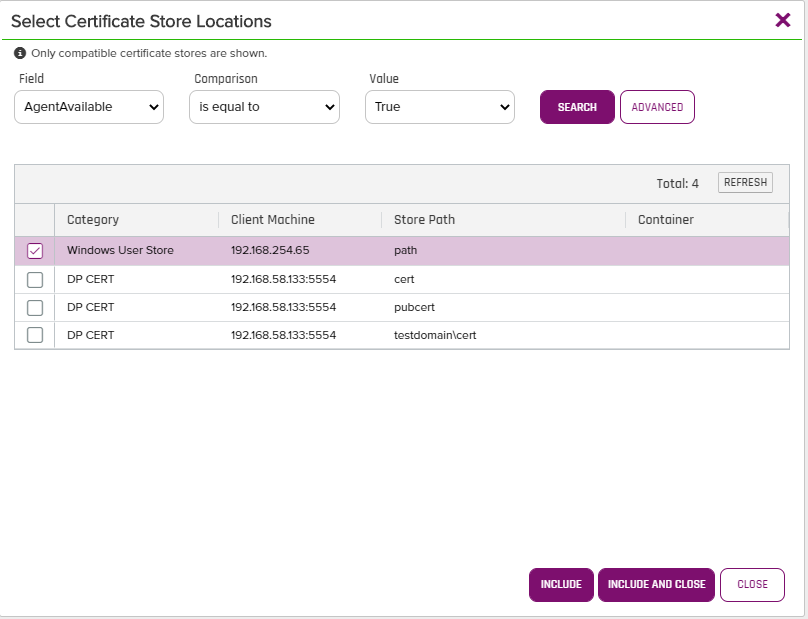
- Now you will be presented with an opportunity to include the Store that you want the Certificate to appear in. In this case we will select the store we created earlier in the document and click the “Include and Close” button as shown below:
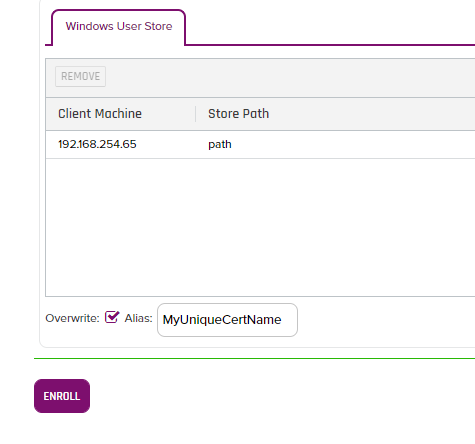
- Finally you will check the “Overwrite” checkbox and make the Alias the same name as the “Common Name” field from earlier and click the “Enroll” button as shown below:
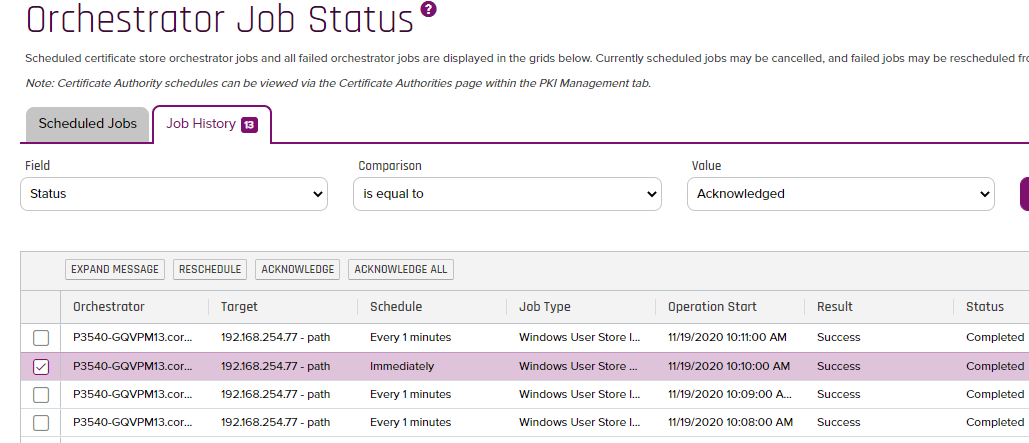
- If we navigate to the Job History by Clicking “Orchestrators/Jobs” and click on the “Job History” tab, you should see a history run of the Inventory Management Job which ran Immediately.
- If we look at the local Cert Store, we should see a new Cert In that Store as shown below (Remember this is using the entries in the App.Config to control where the Certificate is going to land):
-
Navigate to “Certificate Locations/Certificate Stores”.
-
Now if we view the Inventory on that Cert Store, we should see the Certificate added to the store. The inventory job might take up to 1 minute to get in there.
- Reviewing the Inventory, the new Cert is in the store as shown below:
Remove Job
The Remove Job will remove a Certificate from the Windows Store and also remove it from the Keyfactor Store. The following Steps will perform the remove.
-
Navigate to “Certificate Locations/Certificate Stores”.

-
Now if we view the Inventory on that Cert Store, we should see the Certificate added to the store. The inventory job might take up to 1 minute to get in there.

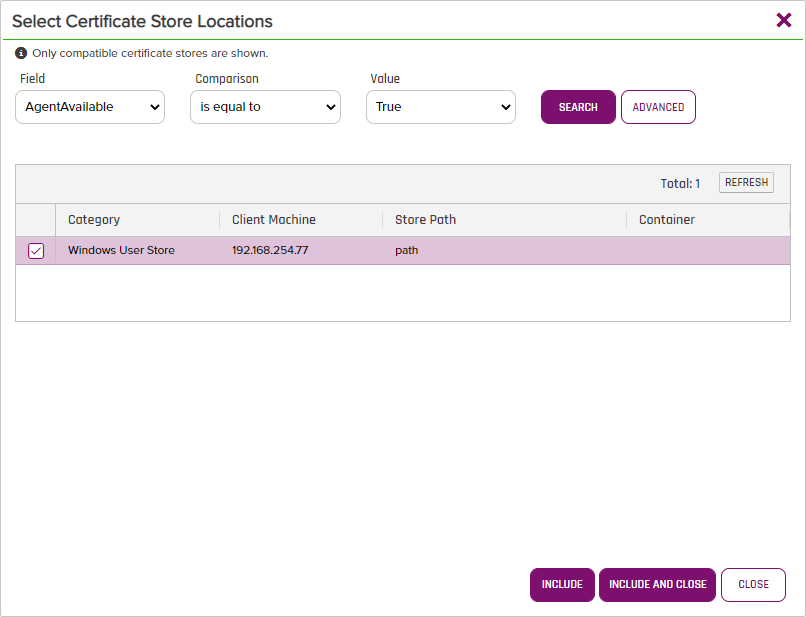
- Now that we see the Certificate we added to the store, we can right click on it and chose “Remove from Certificate Store” as shown below:

- Chose the Certificate Store you would like to remove it from and click the “Include and Close” button as shown below:
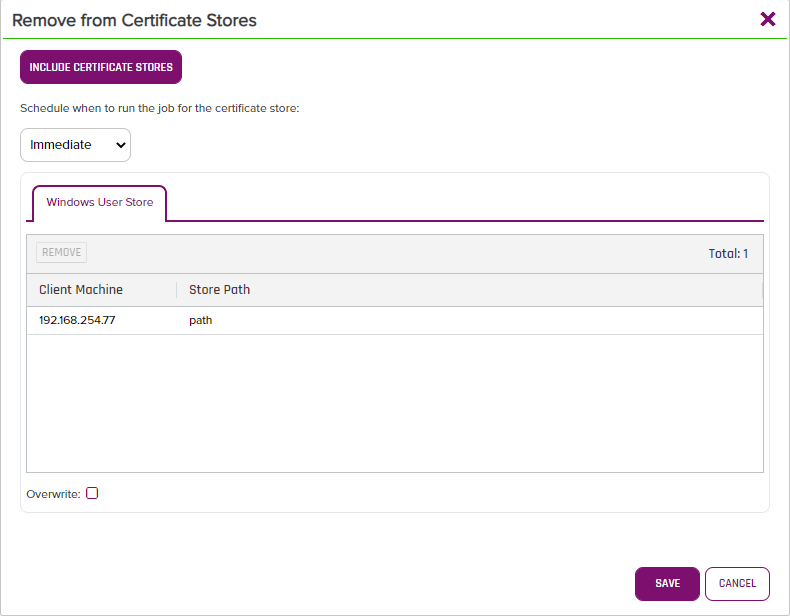
- Click the “Save” button in the Next Screen shown below and the job should kick of to remove the Certificate from the Store and Windows Location.
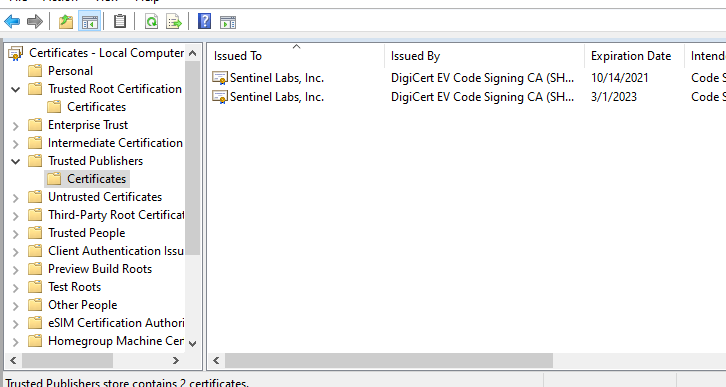
- Review the Windows Certificate location to ensure it was removed and only the Original Certificates are there as shown below:
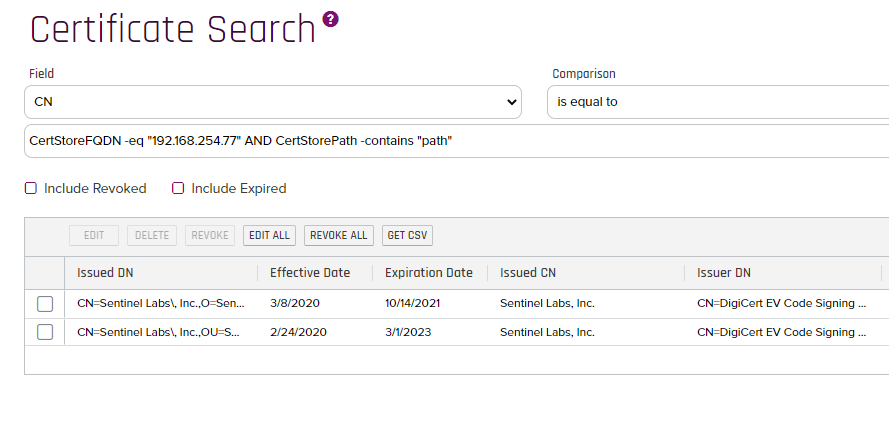
- If you refresh the Certificate Search from Step 2 above you should see the Certificate removed from the Keyfactor Store as well as shown below:
Updates and Debugging
Now that we have successfully Inventoried, Added and Removed Certificates from a Certificate Store, we will walk through how to make modifications/deploy the Code, Debug and review the Logs.
Changes to existing jobs
When updates are necessary to existing jobs in the integration, you can follow the steps below to re-register it.
-
Make your code modifications and recompile the solution into your local bin directory.
-
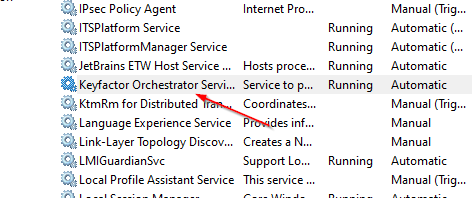
Stop the Keyfactor Windows Service as shown below:
- Perform the steps in Registering The Integration again.
Debugging
If the Keyfactor Windows Service is running and your job is setup to run Every Minute you will be able to Attach to the Keyfactor Windows Service and Debug. In Visual Studio Follow these steps:
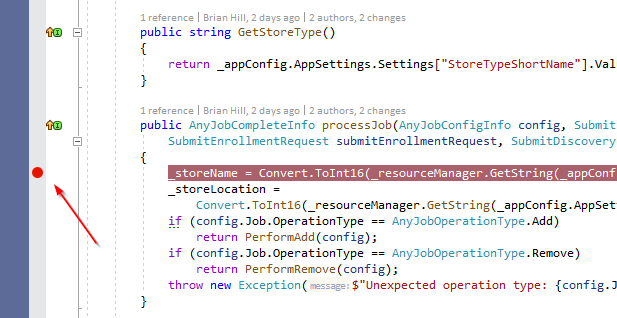
- Set a breakpoint in a known location. A good spot for a breakpoint is shown below:
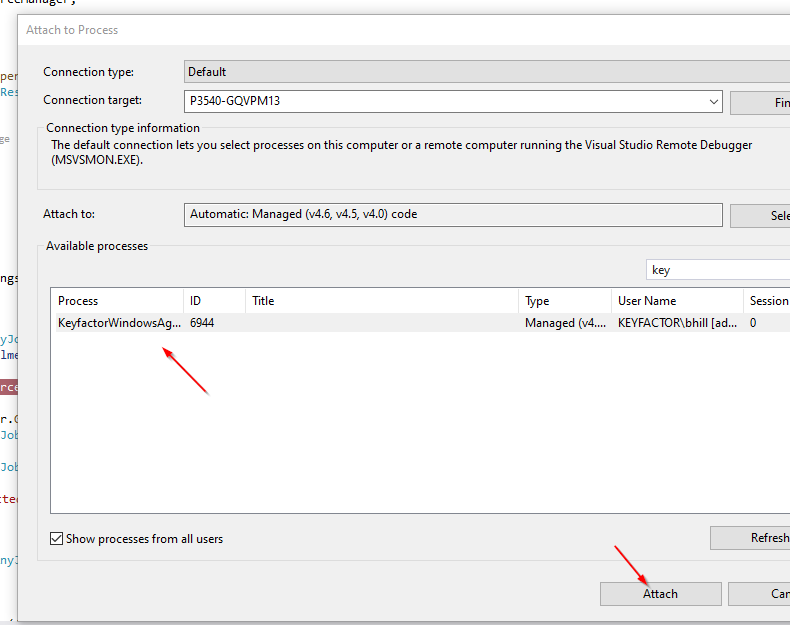
- Attach to the Keyfactor Windows Service as shown below and wait a minute or so until the Job Executes and you should be able to step through the code:
Keyfactor Logs
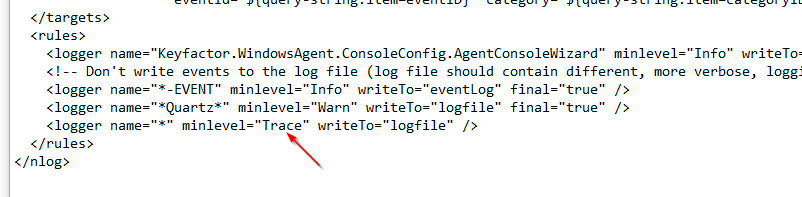
The log files can also be very useful when debugging. The valid trace levels are Trace, Warn, Info and Error; with Trace providing the most detailed information.. The level can be set in the following location:
“C:\Program Files\Common Files\Keyfactor\Keyfactor Windows Orchestrator\NLog.Config”
These logs will be written out the following location:
“C:\CMS\logs”